3d ornament snow scene Instructions
Create your own 3D Christmas Ornament with a layered shadow box effect of a snowy winter scene and Let It Snow banner
This digital die cut file is available for sale in the Silhouette America Online Store HERE.

Supplies
This digital die cut template makes it easy to create your own 3D Christmas Ornament. Finished size is approximately 3.5 inches square by 1.5 inches deep. The opening in the back will fit a small battery operated tealight. You will need the following supplies to create this project:
Digital Die cutting machine (I’ve used my Silhouette Cameo, this file is also Portrait compatible)
Heavyweight cardstock paper (I’ve used Michael’s Recollections, American Crafts Winter, DCWV Glitzy)
Adhesive
Battery Operated Tealight
Ribbon or Twine (for hanging)
Begin by cutting template pieces from desired cardstock. I really like the shiny glitter paper! However, I don’t recommend it for the construction of the box, it works great for the accent pieces. Warning: the layering of the interior pieces take some patience! But if I can manage with my thick fingers, so can you! 😉
Step 1
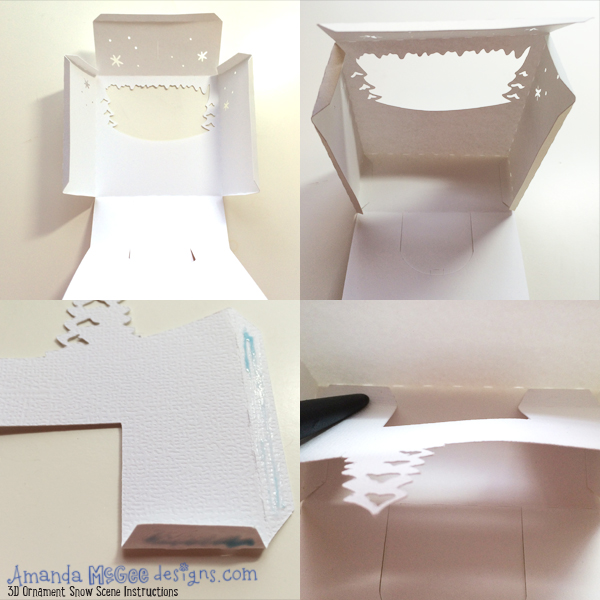
To begin, fold all perforated edges and fold in all tabs.
Adhere the lower side tabs to the bottom edge to create the bottom of the box.
Fold the first interior section as shown, with the bottom tabs facing forward and the side tabs folding back, add adhesive to the side tab and the bottom side of the bottom tab.
Adhere the front tabs to the bottom of the box, lining the edges up with the front of the box. Push down with a craft tool to adhere.

STEP 2
Then, adhere the side tabs to the inside of the box. Make sure the glue dries before moving on to the next step. Trust me, they will shift around and drive you bonkers if the glue is wet!
For the next interior layer, repeat the process of adhering the front tabs and then the side tabs.
Be sure to add any accents (if desired) before attaching the layer to the inside.

STEP 3
You might find it helpful to add glue with a fine tip glue pen to the interior layer side tabs (after the bottom flaps have adhered.)
You might also find it helpful to place the box on it’s side to press down the side flaps.
It’s ok if your layers get a tiny bit wavy or they don’t line up perfectly.
Just be sure there is enough room at the back to fit in the last layer so the tabs don’t extend beyond the edge of the box, or it won’t close.

STEP 4
To create the hanger, glue one side of the circle.
Fold over to adhere.
Slide into the slit on the top of the box.
Fold open and glue each flap over to the inside of the box top.

STEP 5
Next, fold in all tabs on the back side of the box.
Add glue to the tabs, fold up the back to adhere. Make sure to bend down the little tab on the back door.
Add the front snow accent to the outside of the box.
Bend the banner edges along the perforation lines as shown.

STEP 6
You might find it hard to glue glitter paper, I find that glue dots work great!
Attach the banner to the front of the box.
Slide a battery operated tealight into the back of the box.
Add a bow to hang the box as an ornament.

STEP 7
The battery operated tea light makes for a wonderful glow at night!
Enjoy and Season’s Greetings!
Amanda